Qovery makes it easy to create an EKS cluster on your AWS account and manage the deployment of applications on it. But you still might want to execute operations on it via kubectl like you would on any other Kubernetes cluster.
You have several ways to connect to your cluster:
- Activate IAM group sync, more on that here
- Activate SSO support on your cluster allowing users to connect using AWS SSO.
Before you begin, this guide assumes the following:
- You have AWS CLI installed
- You have configured an
Adminsgroup (or any group used for admins) as described in the Qovery AWS setup - You have an existing EKS cluster managed by Qovery
- You have followed this AWS tutorial up to
AWS SSO user configurationexcluded.
Goal
This tutorial will show you how to access a Qovery managed cluster using AWS SSO.
Install and configure your toolchain
kubectl
To interact with your cluster, you will need
kubectlinstalled. https://kubernetes.io/docs/tasks/tools/AWS CLI
The AWS CLI must be installed and configured on your machine. https://docs.aws.amazon.com/cli/latest/userguide/cli-chap-getting-started.html
Select IAM user group you configured for Qovery as admin
In AWS console, go to
IAM > User Groups
then select the group you configured as admin group for Qovery (
Adminsin the example below).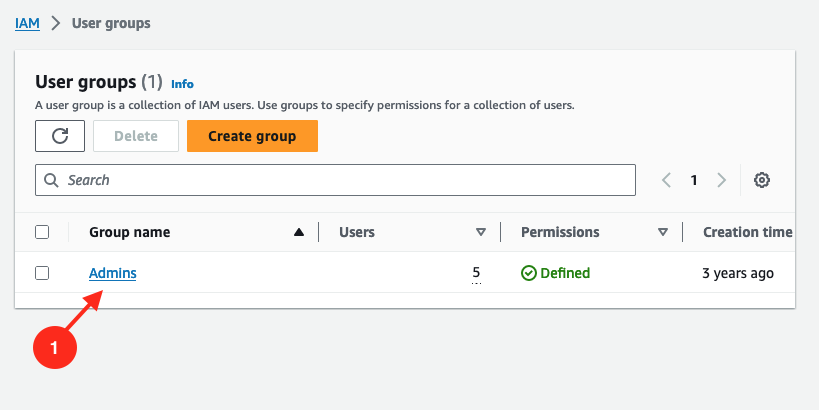
Create a new policy to this group allowing full access to EKS resources
In this admin group, go to
permissionstab. Click onAdd permissions > Create inline policy.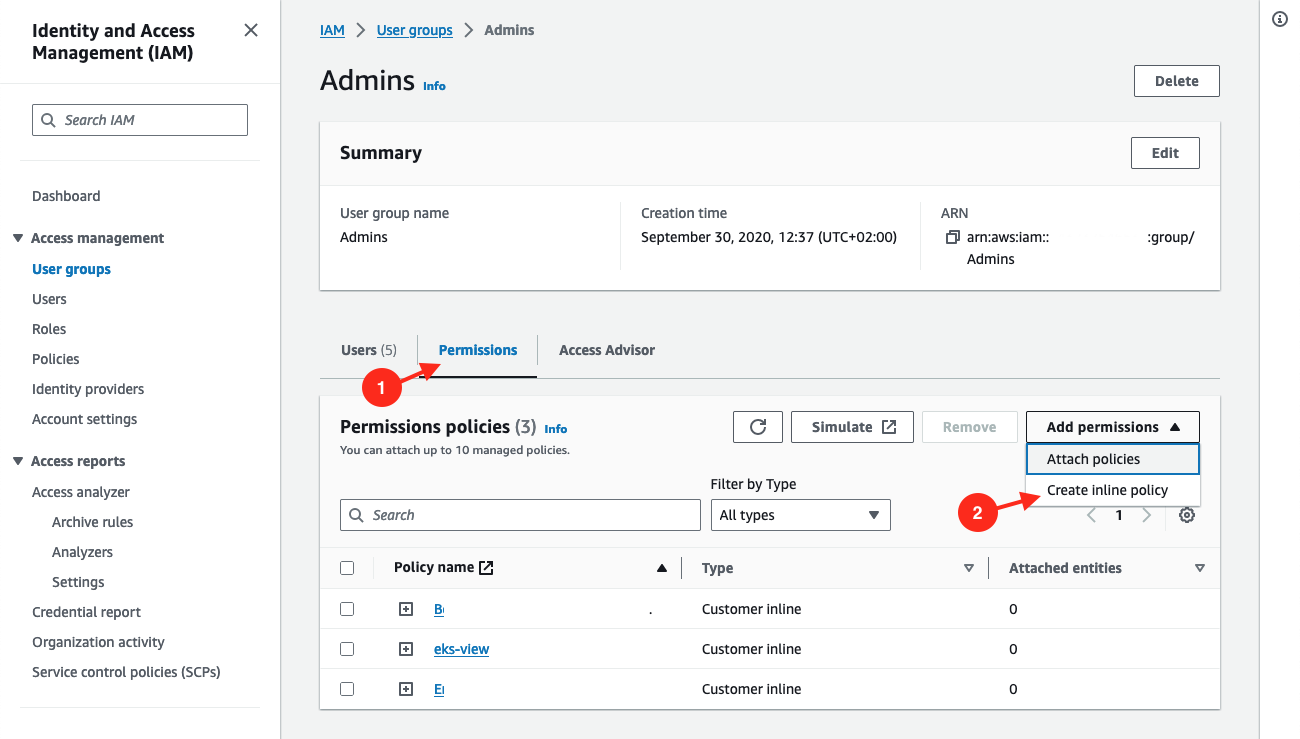
Switch to JSON view.
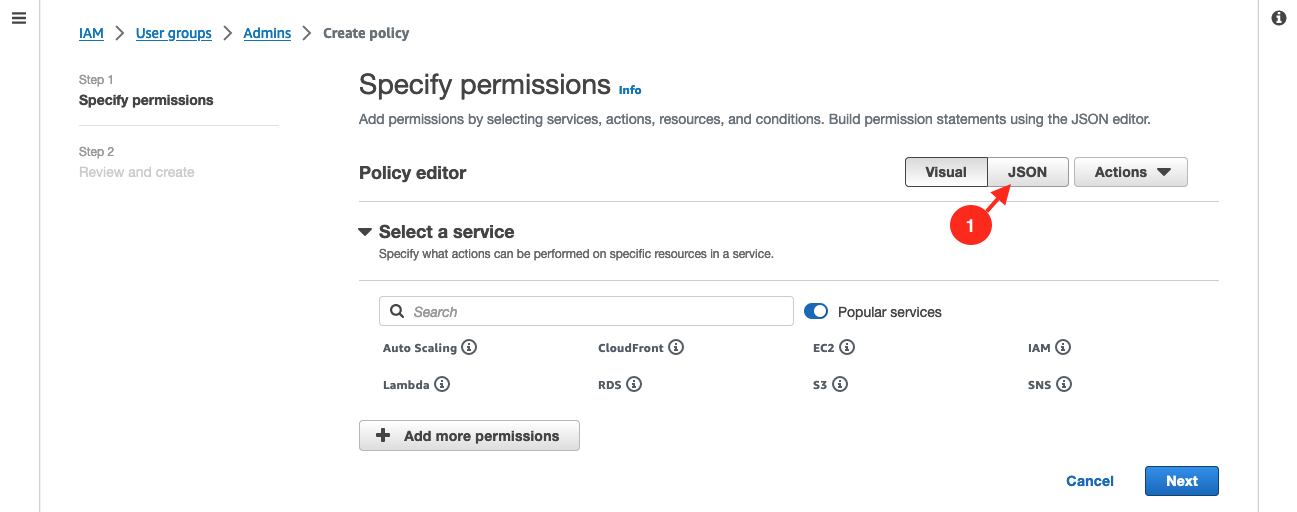
Put this content to the
Policy editor:{"Version": "2012-10-17","Statement": [{"Effect": "Allow","Action": ["eks:*","sts:AssumeRole"],"Resource": "*"}]}Then click on
Next.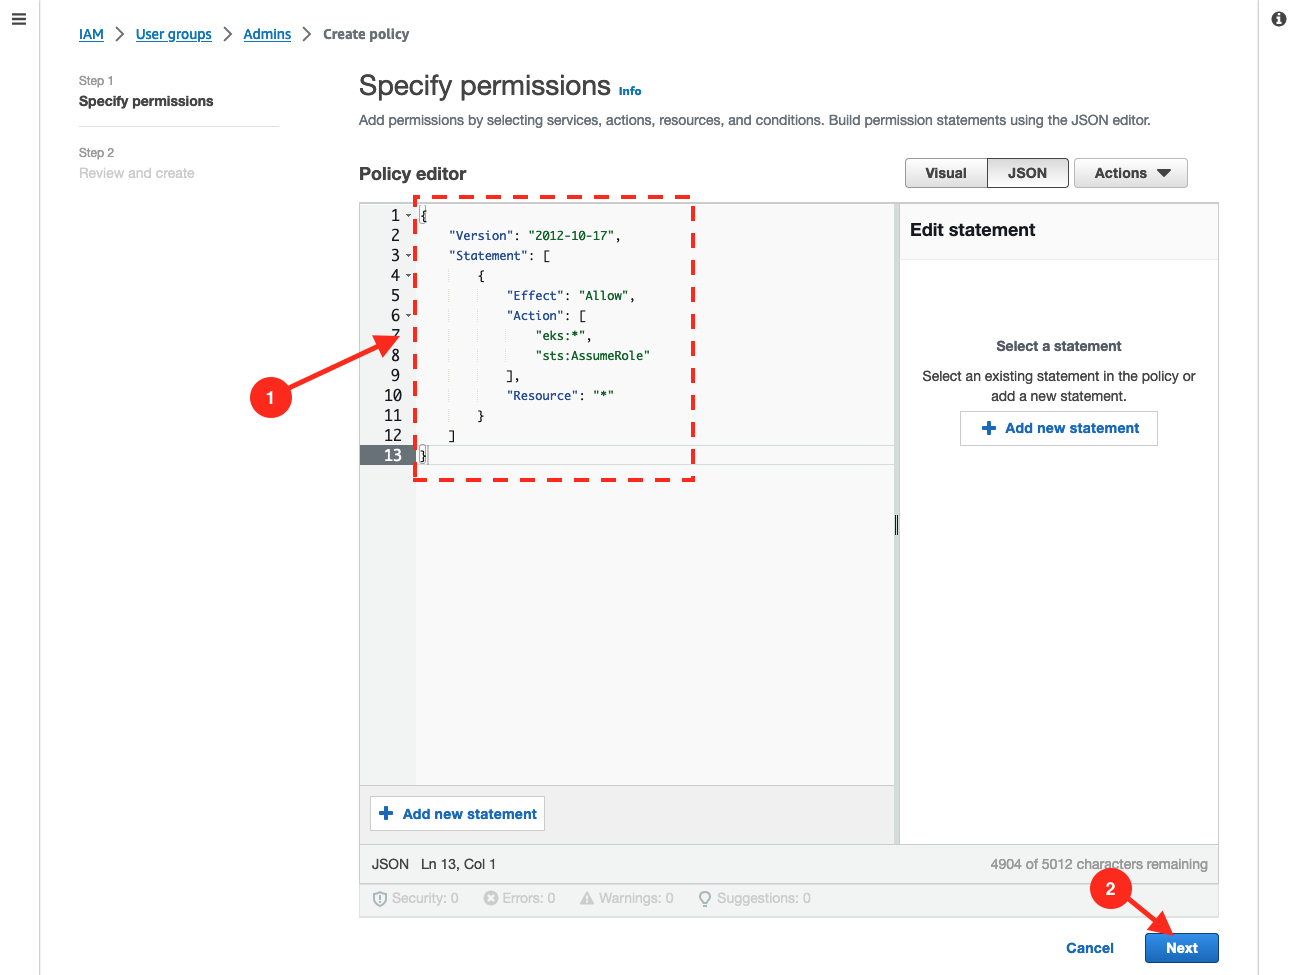
Give a name to this new policy, for example
SSO_EKSClusterAdminAccess. Then click onCreate Policy.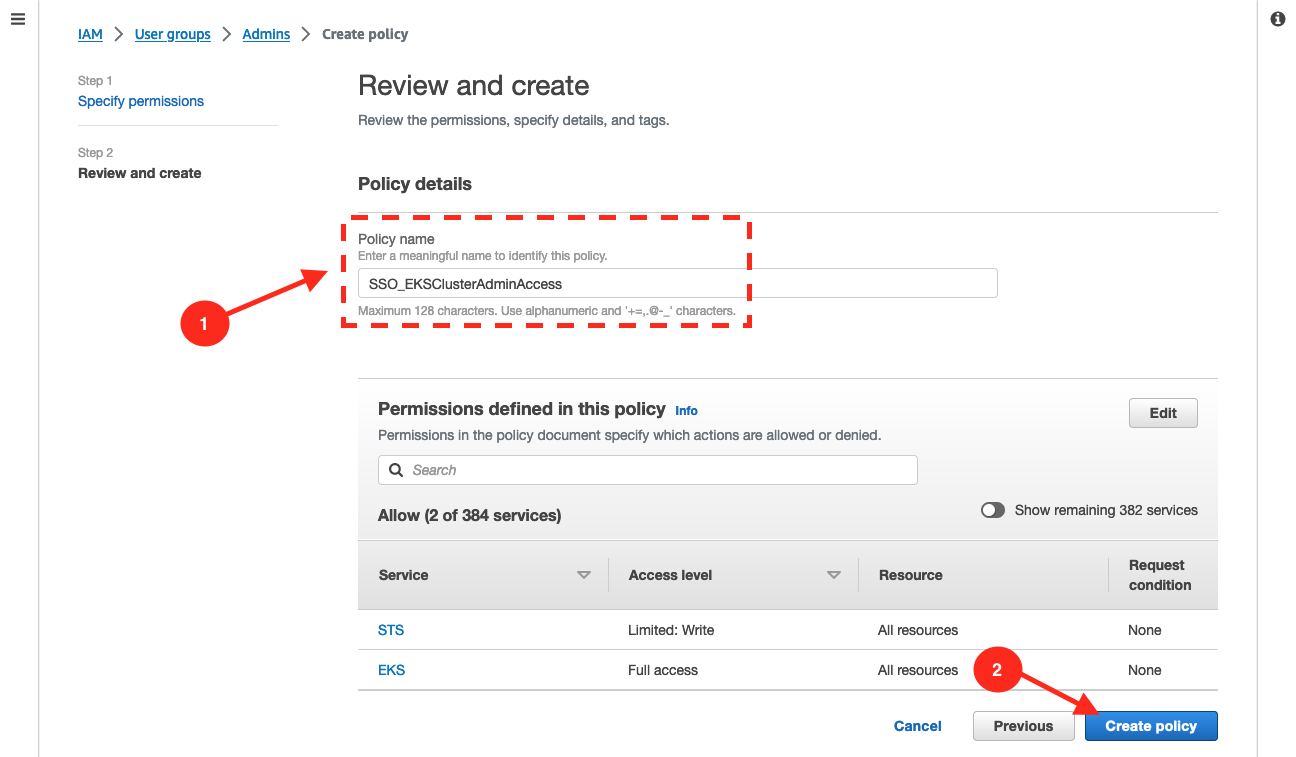
Set up CLI with SSO access to EKS
Create a named SSO profile using AWS CLI.
aws configure ssoYou will be prompted an SSO session name, put what you want, I used
sso-benjamin.SSO session name (Recommended): sso-benjaminAttempting to automatically open the SSO authorization page in your default browser.If the browser does not open or you wish to use a different device to authorize this request, open the following URL:https://device.sso.us-east-2.amazonaws.com/Then enter the code:FHTG-****You will be redirected to your browser, validate the form.
Then you will be prompted to select your AWS account.
There are 1 AWS account available to you.Then you will be prompted for default region (
eu-west-3in my case), output format (jsonin my case) and profile name (bchastanier_ssoin my case, but feel free to pick whatever you want).Using the account ID 283389****The only role available to you is: AdministratorAccessUsing the role name "AdministratorAccess"CLI default client Region [None]: eu-west-3CLI default output format [None]: jsonCLI profile name: bchastanier_ssoGet SSO role ARN
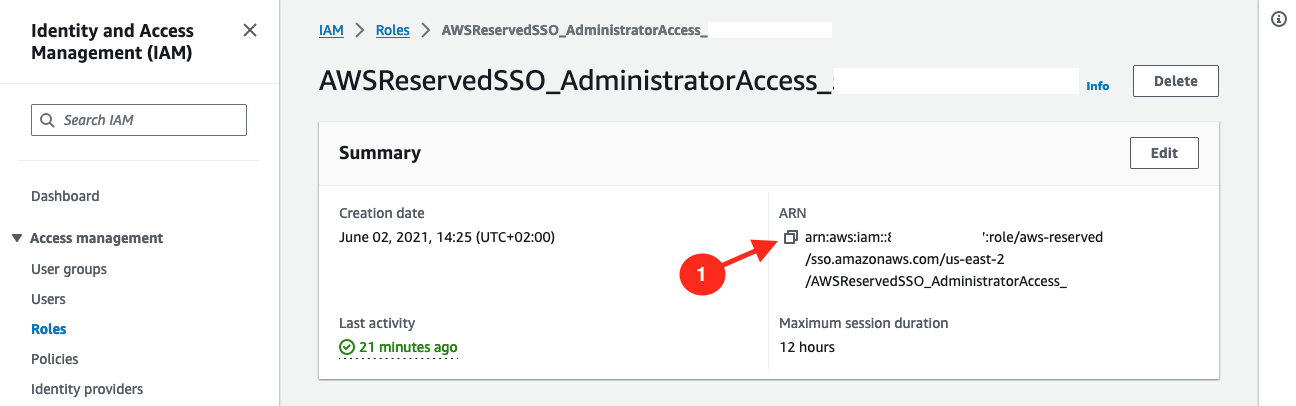
Go to AWS console > IAM > Roles.
Look for a role named
AWSReservedSSO_xxand select it (name can varies based on what you have configured / how you named yourAdminsuser group, but it should start withAWSReservedSSO_).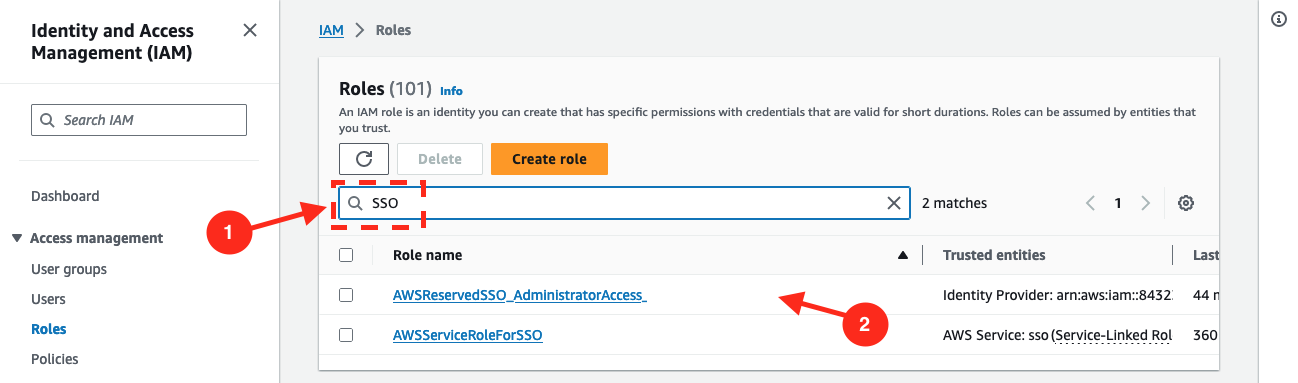
Copy its ARN and keep it somewhere, you will need it in next step.
Enable SSO on your cluster
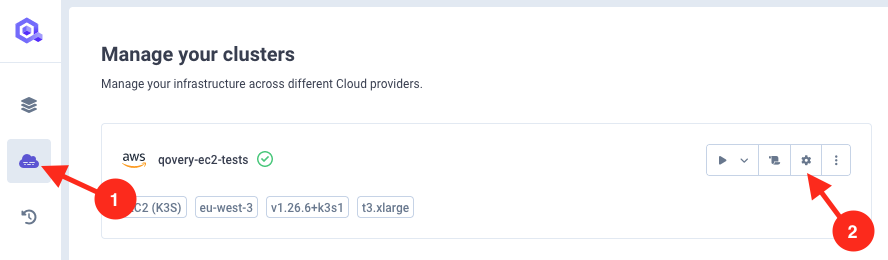
Go to your clusters in Qovery console and click on cluster you want to activate SSO on settings.
Then go to advanced settings, and set:
aws.iam.enable_ssototrueaws.iam.sso_role_arnto the SSO role ARN string you copy from previous step.
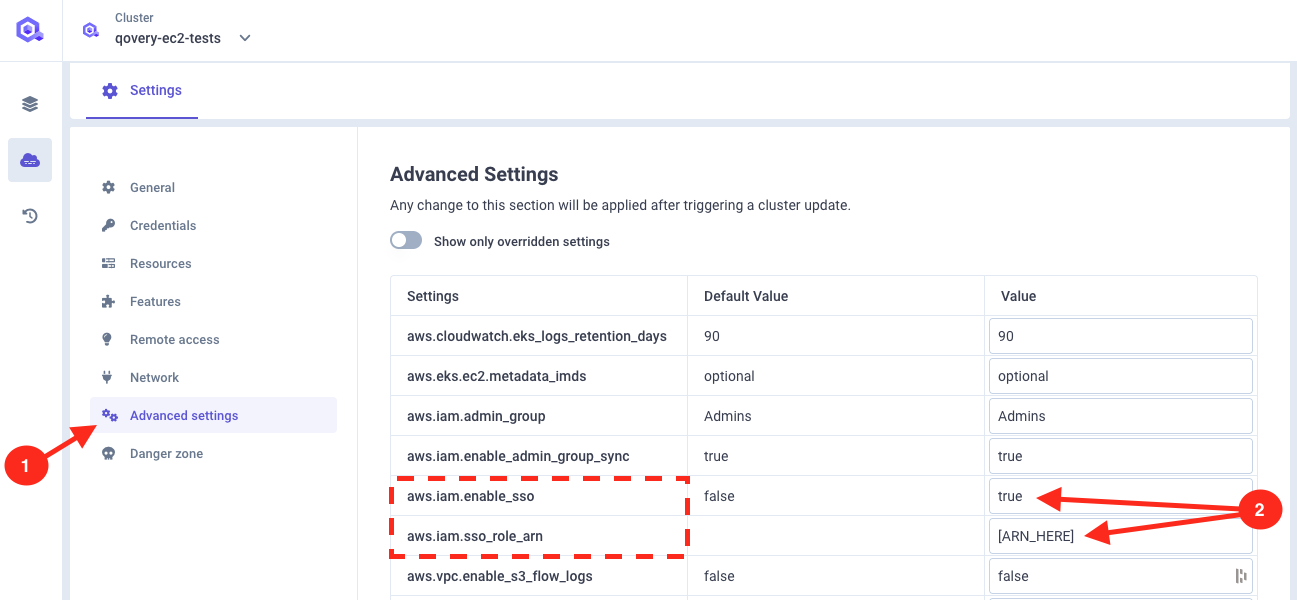
Redeploy your cluster once advanced settings are saved.
Download the Kubeconfig file
To connect to your EKS cluster you will need to set a context to
kubectl. This is done with aKubeconfigfile.When installing a new cluster, Qovery stores it in an S3 bucket on your account. You can retrieve the Kubeconfig of your cluster directly from the Qovery interface by following the procedure "Get your cluster kubeconfig file" within this section.
Connect to your cluster
Connect via the CLI running this command:
aws sso login --profile <your-sso-profile-you-set-before>This will open your browser and prompt you to connect, validate the form.

Now you should be able to access your cluster without anything else, let's try to get
aws-authconfigmap showing users and roles allowed to connect to the cluster:AWS_PROFILE=<your-sso-profile-you-set-before> kubectl describe -n kube-system configmap/aws-authThis should give you the config map content. If not, something is not properly configured.
Conclusion
You can access your Qovery clusters via your SSO directly.